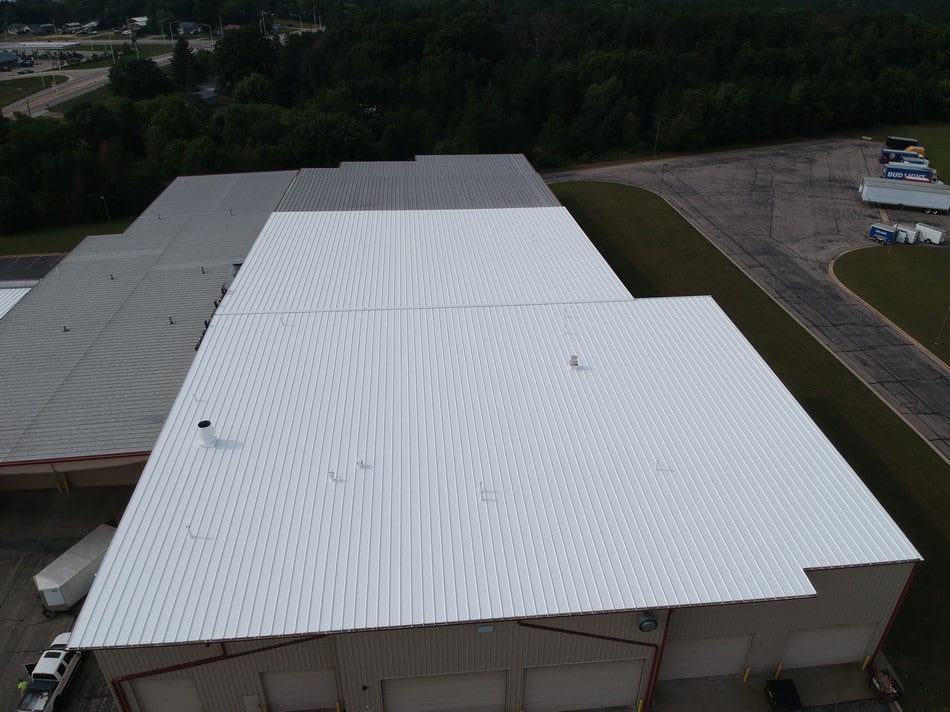
Metal roofs are built to last—but even the toughest materials need maintenance. At SR Commercial Roofing, our spray-on restoration system can add 20+ years to your metal roof’s lifespan without the cost or hassle of replacement. In this conversation, we’re going to go through our process for metal roof restoration, but first, we want to discuss the difference between restoring and replacing a roof and the benefits of roof restoration.
What’s the Difference between Metal Roof Restoration and Metal Roof Replacement?
When a metal roof deteriorates and begins leaking, the metal needs to be replaced, patched, or sealed. Two alternative options to fixing a leaking metal roof are replacing the metal roof or restoring the metal roof.
Replacing a metal roof requires tearing off and scrapping the original metal and then replacing the roof with new metal sheets. Restoring a metal roof, which is what SR Commercial Roofing specializes in, is cleaning the original metal before sealing it with coatings to prevent leakage and extending its life by roughly 20 years!
Figure 1: Finished Metal Restoration
Why Restore Instead of Replace?
Before diving into our process, let’s address a common question: “Why not just install a new roof?”
- Cost Savings: Restoration costs 70% less than full replacement on average
- Minimal Disruption: No tear-off means your business stays open
- Sustainability: Keeps tons of metal waste out of landfills
- Energy Efficiency: Cooling the roof
A metal roof replacement costs $10-$12/sq. ft. typically, but a metal restoration, like SR Commercial Roofing offers, usually costs $3.50-$5/sq. ft.
Metal restoration allows your business to stay open since it only requires cleaning off the roof and spraying coatings while metal replacement requires tearing off the old roof and installing the new roof which can require the business to close while the replacement is underway.
As far as waste goes, metal replacement requires tearing off and disposing of the old metal while metal restoration has minimal waste since the metal does not need to be torn off.
Finally, metal restoration can help with energy efficiency since the white top coat is reflective. It reflects the sun’s rays which decreases the roof’s surface temperature. Roofs without coatings can reach temperatures of 136 degrees Fahrenheit, but once sprayed with a white top coat, the same roof on the same day can be 86 degrees Fahrenheit [1]. That’s a 50-degree temperature difference which helps the building stay cooler in the summer months!
Our 6-Step Metal Roof Restoration Process
Here’s how our process to install a metal restoration roofing system and why each step matters.
Phase 1: Surface Prep – The Foundation of Longevity
Step 1: “Rust Off” Treatment
“Rust Off” is an eco-friendly solution that dissolves rust and creates a protective layer to prevent future corrosion. Our first step is to remove the rust because when rust is left untreated, it spreads like cancer under the coatings and can increase structural damage.
Figure 2: Rust on roof before using “Rust Off”
How we do it:
- Spray “Rust Off” evenly across the entire roof
- Let it sit for 10-15 minutes (no pressure washing yet!)
- “Rust Off” converts rust into stable iron phosphate that can be pressure washed off the roof (and is safe for drainage)
Step 2: Pressure Washing
Pressure washing removes dirt, debris, and loose particles (like the iron phosphate the rust has been converted into). A spray-on coating will not stick to contaminated surfaces, so pressure washing is critical for the new roof coating’s installation process. Removing dirt and debris also ensures that any mold on the roof is removed and not allowed to grow under the coatings.
Figure 3: Cleaned roof
Once the roof dries, we are ready to move into Phase 2 of metal restoration.
Phase 2: Sealing & Strengthening
Step 3: Primer Application
Primer fulfills a couple purposes:
- Fills microscopic pores in the metal to create a smooth surface for the rest of the coatings
- Creates a “glue layer” for the base coat – primer is the stickiest coating we spray which ensures that the roof and base coat fully adhere to one another.
Step 4: Screw Tightening & Caulking
Screws loosen for two primary reasons: temperature fluctuations and wind. When temperatures change like in the spring, they cause thermal expansion and contraction that causes metal to move and screws to backout. The second cause of loosened screws and fasteners is wind, which can cause an uplifting force that pulls them out.
We replace any screws that are missing or rusted out and tighten screws that are backing out. We then seal all fasteners with caulk to prevent water from leaking in around them and causing rust.
Figure 4: Caulked screws (white patches)
Phase 3: Weatherproof Armor
Step 5: Base Coat + Fabric Reinforcement
We focus on laying fabric reinforcement and base coat on the roof’s weak points: Seams, endlaps (where one metal sheet overlaps another), protruding pipes, and HVAC, which are where a majority of leaks start.
Figure 5: Base coat sprayed on seams with fabric laid
Our technique:
- Spray base coat over seams and endlaps and around pipes and HVAC
- Lay a multi-layered, mesh fabric that places a flexible, strong structure over the seam
- Saturate with additional base coat
- Brush the fabric into the base coat to fully seal and waterproof the seams, endlaps, pipes, and HVAC
The result is a flexible, waterproof barrier that prevents water from seeping into cracks in the roof while also moving with the roof’s expansions and contractions as temperatures fluctuate.
Step 6: Top Coat – The Final Shield
The top coat creates a final, seamless roof that is waterproof, reflective, and weather-resistant. The seamless roof helps dirt and debris to slide off the roof with rain without catching on seams, fasteners, or endlaps and also makes the roof waterproof since there are no seams for water to enter by.
Our top coat at SR Commercial Roofing is usually white (unless a different color is requested) which reflects a majority of UV rays and thus keeps the roof cooler.
Figure 6: Top coat application in progress (see red-brown color in bottom right corner)
Figure 7: White top coat sprayed – Metal Restoration completed
Beyond the Basics: Key Upgrades We Offer
While our core process works for most roofs, we add these extras for challenging situations:
- Coatings Upgrade: Higher grade coating that contains more urethane (coatings take longer to erode from UV exposure) and has a longer manufacturer guarantee
- Custom Colors: Match corporate branding while maintaining reflectivity
- Thermal Drone Inspections: We offer a thermal drone scan that produces an energy and reflectivity report which helps to see where energy is escaping the building and where leaks are forming.
FAQs
Q: How long does the process take?
A: Most roofs take 2-4 days depending on the size of the roof.
Q: Can you coat over existing paint?
A: No, if it is silicon, but we can coat over many other paints if they remain after pressure washing.
Q: What about warranty?
A: Our standard warranty is a 10-year warrany, but we also offer a 20-year warranty as an upgrade option.
Q: How messy is the process?
A: Very minimal. We might block off a few parking spots, but the business can stay open. After installing the new roof coatings, cleanup is minimal since the coatings quickly turn to dust in the air.
Why Choose SR Commercial Roofing?
- Local Experts: 10+ years serving in the southwest Wisconsin region
- Licensed & Ensured Crews: SR Commercial Roofing and its employees all have the necessary licensures and insurance to work on roofs
- Small Company: A small crew of 5 people (including the owner) which makes communicating quick and efficient
Next Steps for Building Owners
Call 608-844-4933 to ask any questions about metal restoration and/or your roof or visit https://seamlessroofsllc.com/. We offer a free inspection along with the resulting quote. We are happy to answer any questions you have and problem solve with you to discover the best solution for your roof.
—————————–
Citation(s):
[1] https://seamlessroofsllc.com/maximizing-energy-savings-with-spray-foam-roofing/